notice
This is documentation for Rasa X Documentation v0.42.x, which is no longer actively maintained.
For up-to-date documentation, see the latest version (1.1.x).
Deployment Environments
Rasa Enterprise Feature
Ready for Rasa Enterprise? Schedule a technical demo ->
Architecture
Rasa Enterprise allows multiple versions of an assistant to be run simultaneously and served to different users. By default, two environments are defined:
productionworker
This page provides a walkthrough of the best practices for managing the lifecycle of a Rasa model.
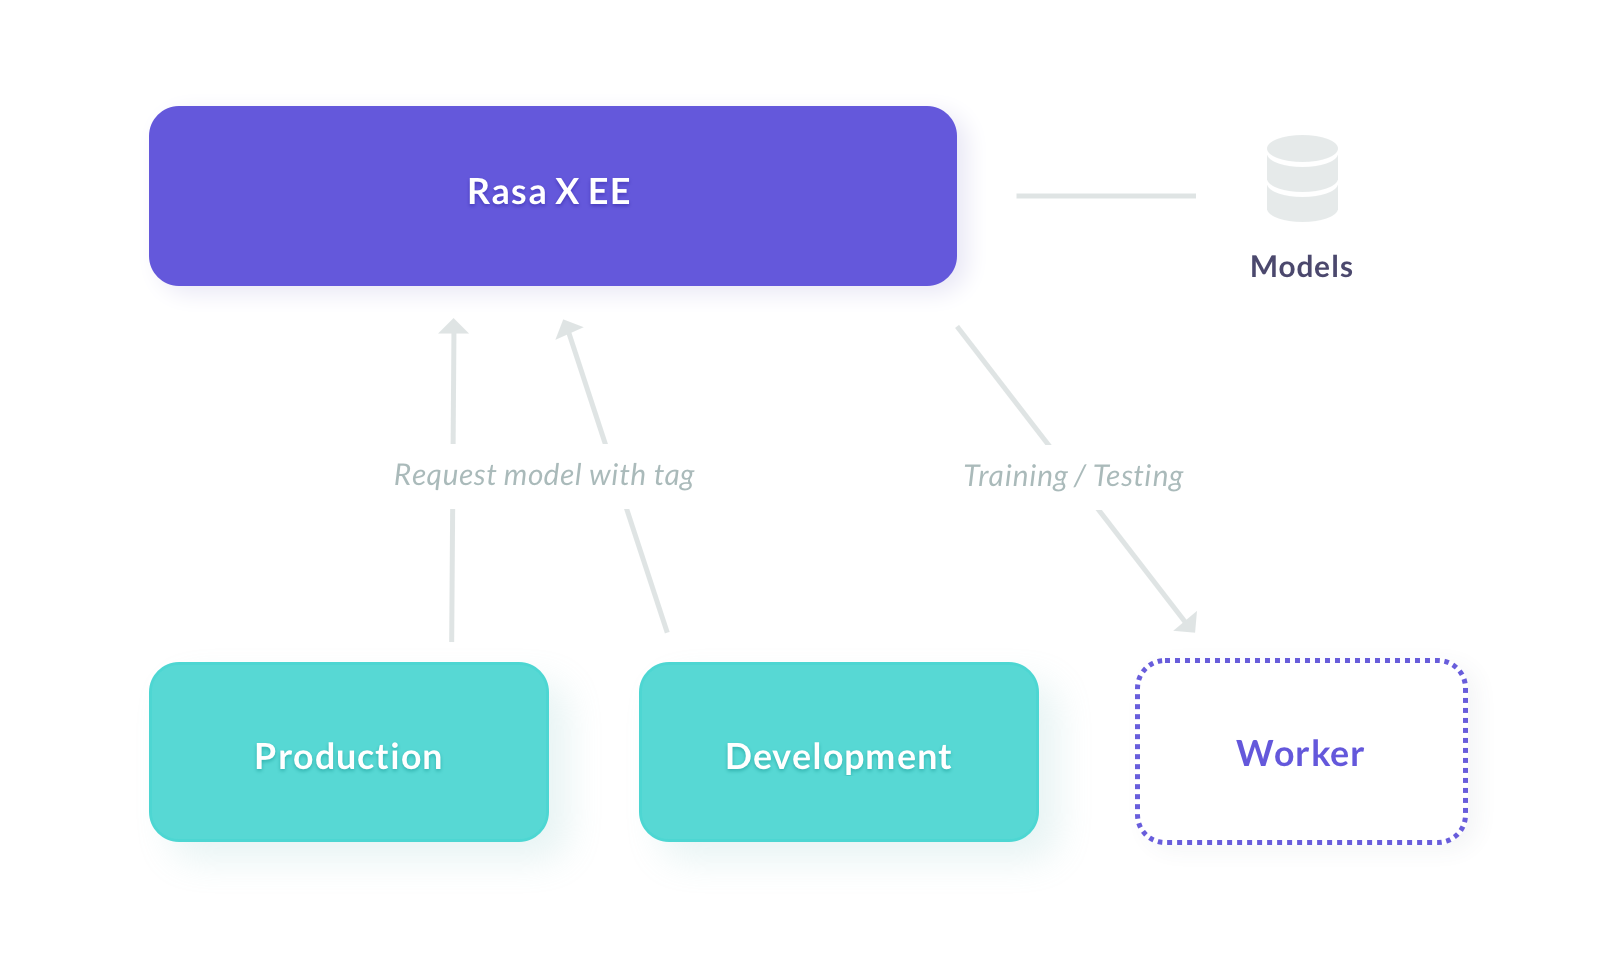
Each environment corresponds to a Rasa server which
uses the model with the corresponding tag (e.g. production).
The model training happens on the worker instances to ensure the training does not
degrade performance.
A model can be given multiple environment tags, but each environment can only have
a single model associated with it. If model A is tagged experimental and you promote
it to production, the model will now have two tags, and the two environments will
use the same model. This ensures that you can promote a model to an environment
without affecting any others.
The name and number of environments can be customized when deploying Rasa Enterprise.
note
In a typical web application, the experimental,
and production environments are often isolated from each other
(e.g. running on separate machines). In a machine-learning application, you want
to seamlessly collect training data from your production users, integrate it into
the development models, and promote those models into production to get
a continuously improving system. For this reason, we recommend running all
of the environments on the same cluster.
Workflow
note
This workflow assumes, you already added an additional deployment environment.
If you are only running the production and no experimental environment,
you can follow the guide in the next section which explains how to add a new
environment.
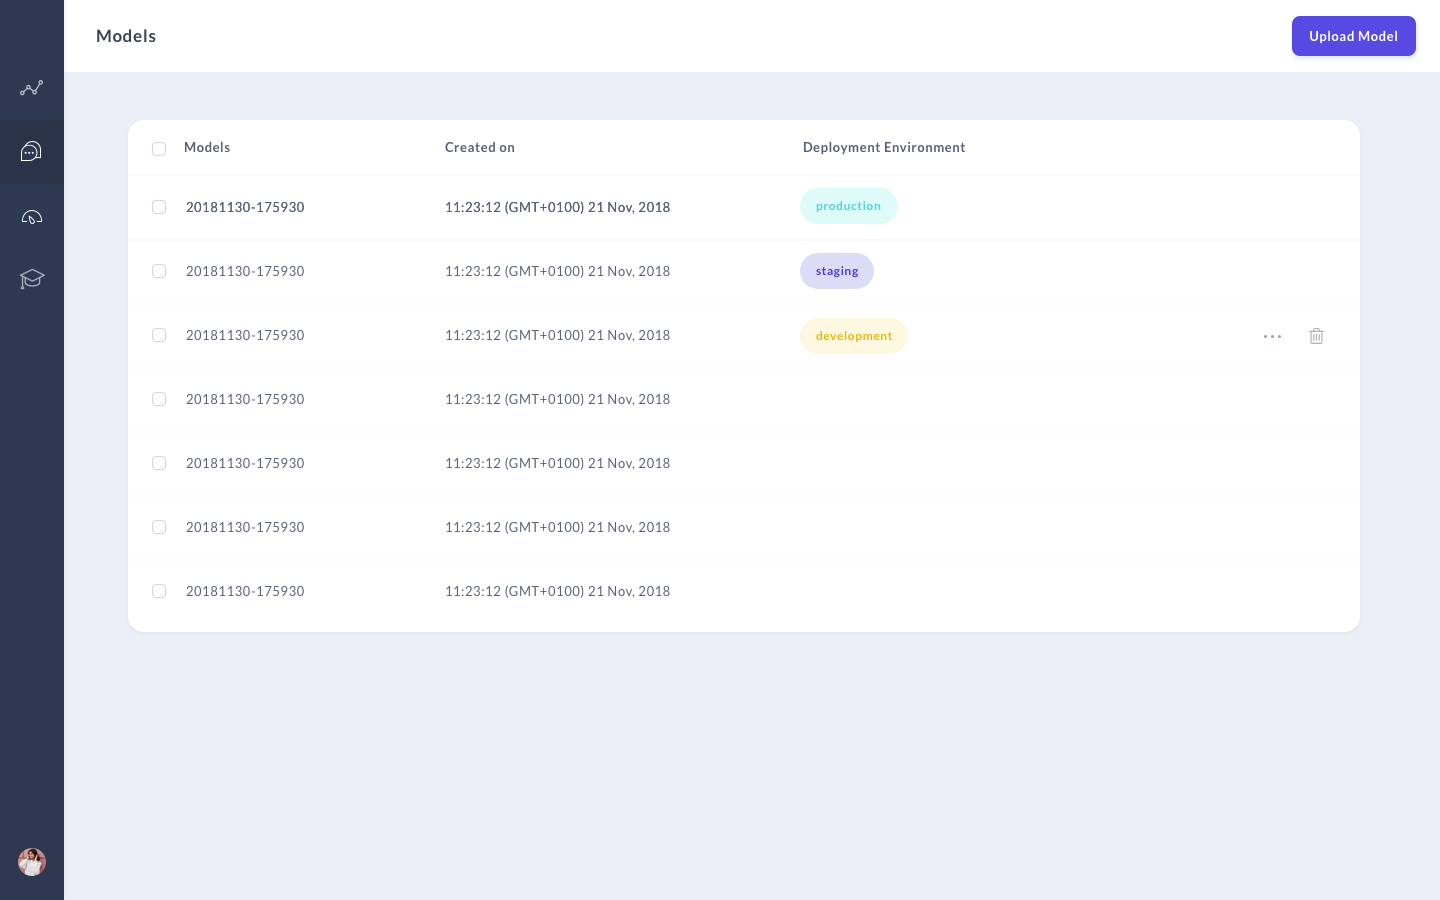
- The first step is to move a trained model into the
experimentalenvironment. To do this, first navigate to the models view. Hover over a model, and click the three dots menu which appears on the table row. Now you can select theexperimentalenvironment and click ‘Save’.
This model will now be used to serve users at the endpoint
/conversations/{sender_id}/messages?environment=experimental.
note
To promote a model to experimental you need to have the
environments.experimental.write
permission. Check with your admin if you do not have sufficient permissions.
Now that your model is running in the development environment, you can do some testing. Navigate to the ‘Talk to your bot’ view and select ‘experimental’ from the dropdown on the right. If you make any improvements, like adding more training data or updating the response templates, you need to use the ‘train’ button to create a new model and promote that model to experimental.
Once you are satisfied with your model’s performance, repeat step 1 but instead selecting the
productionenvironment.
note
By default, only the admin role has the permission to modify the
production environment. You can customize this in Role-Based Access Control
Customizing Deployment Environments
You currently cannot modify your deployment environments via the API or the user interface. In order to customize the environments (e.g. to create a new one), you will have to edit your deployment setup.
Rasa Enterprise lets you run multiple Rasa models in parallel, allowing you to test different environments promoting them to production. In this section we’ll show you how to
Launch additional Rasa servers that run your models
Make the additional servers accessible in the
/conversationstabAssign tags to the Rasa models so they’re run by the right server
Starting Additional Rasa Servers
By default, Rasa Enterprise runs two Rasa servers: one
that should be used in production and one worker
that executes certain long-running tasks like training models. To enable
another environment, create a new Rasa server in addition to the predefined
rasa-production and rasa-worker servers.
To add a development environment (rasa-development) to your configuration,
add the following service definition under services: to your docker-compose.yml found in
the /etc/rasa directory:
It’s important that the RASA_ENVIRONMENT variable is
unique, and that RASA_MODEL_SERVER requests a unique tag, in this case
development.
updating rasa x
If you update Rasa X by retrieving a new
Docker Compose Install Script,
you'll need to re-add this service, as the docker-compose.yml file gets overwritten during upgrade.
Updating the Environments Config
We need to let Rasa Enterprise know about the newly defined Rasa servers, so that you
can talk to the models running on it in the
/conversations view. Following the example of our rasa-experimental
service, add an entry to your environments settings in the environments.yml file:
The hostname part of url has to match the service name defined in
docker-compose.override.yml (in this case rasa-development).
token authentication
By default, all Rasa servers share the same
token, but you are free to define a separate token for each service.
To achieve this, replace ${RASA_TOKEN} above with your <TOKEN>,
and add an entry in the environments section of the new service in
docker-compose.override.yml: RASA_TOKEN: "<TOKEN>".
Tagging a Model
The final step is to upload a Rasa model and assign the right tag. You can upload and tag your new models in the interface or via the HTTP API.